
Most of us have those nights where cooking is absolutely the last thing in the world we want to do. Whether you’re tired from a long day at school, uninspired by the contents of your fridge, or just wanting to switch off and binge Netflix uninterrupted for an evening, sometimes a cheeky takeout is exactly what you need.
That said, I thought I’d create a mini-guide to my most used apps for food delivery in Seoul. Proceed with caution, though… once I discovered how easy it was to get pizza delivered at midnight, I had to start exercising some serious self-control.
1: Shuttle
When it comes to food delivery in Seoul, it doesn’t get any easier than Shuttle. Firstly, the app is entirely in English, which is great for those still getting the hang of Hangeul.
In addition to this, every staff member you’ll interact with will be an English speaker. This means that, if the pizza place is out of pepperoni (a nightmare I hope nobody has to endure), you’ll get a call from an English speaker who can contact the restaurant and adjust the order on your behalf. As someone who’s inexpertly stumbled their way through many an unexpected Korean phone call, I cannot underplay how delightfully easy this makes the whole process.
This convenience does come at an inevitable cost. The delivery fees are relatively high and vary depending on which area of Seoul you want your food delivered to. If you’re in the Itaewon area the delivery fees may be justifiable – however, if you find yourself ordering from Gangnam for example, you might have to pay a steeper price.
2: Yogiyo
It seems that many people are apprehensive about trying Yogiyo, mainly because the whole process appears to be a bit intimidating. Whilst it’s true that a grasp of Hangeul will make Yogiyo infinitely easier to use, you really don’t need a mastery of the Korean language in order to use it.
If you’re still new to Korean, this app is trickier than Shuttle to navigate at first, so let’s take a closer look:
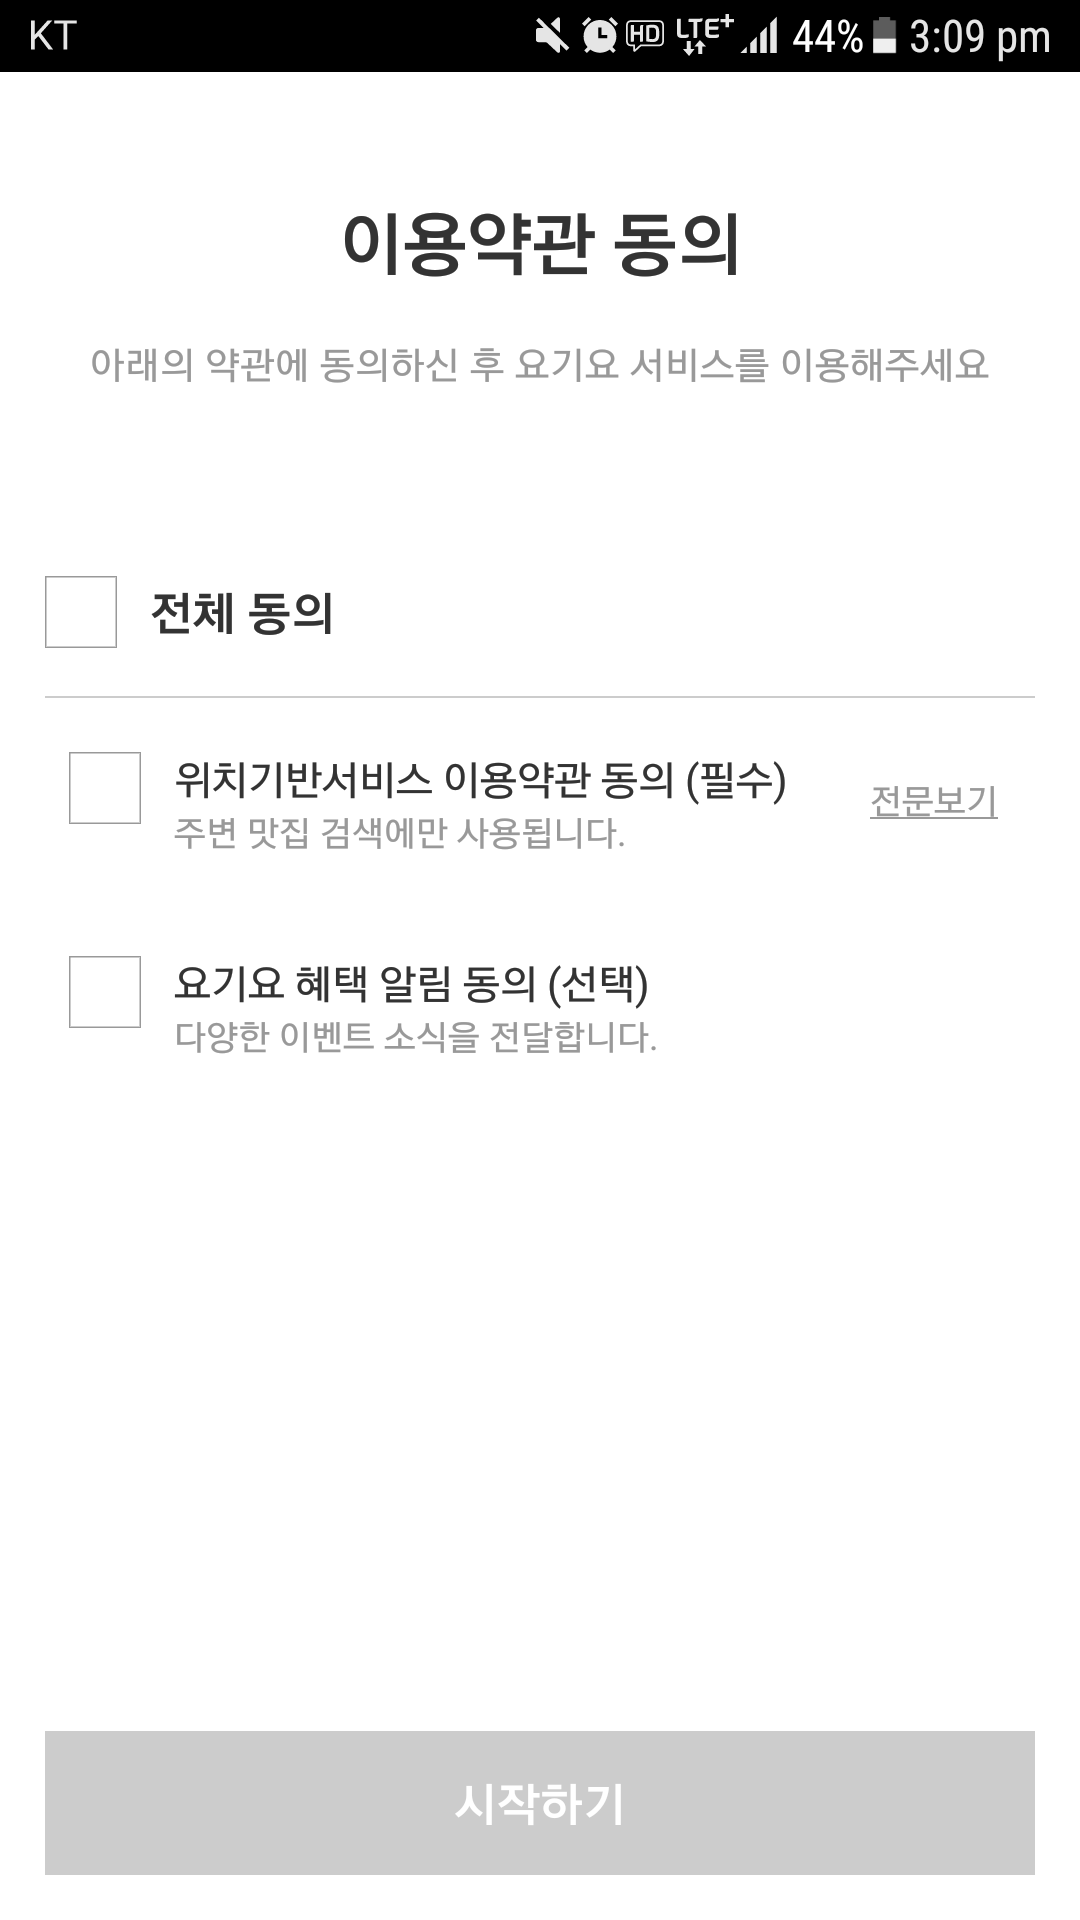 Once you’ve downloaded the Yogiyo app, you’ll be faced with a screen that looks something like this:
As you may have guessed, this is where we agree to the terms and conditions of using the app. We have a choice of three boxes to check – let’s ignore the top one for now, and focus on the two below it.
Ticking the box in the middle indicates that you agree to the terms of service. In order for you to use the app, it is compulsory for you to tick this one (as indicated by ‘필수’). Personally, I’m terrible at reading these things in English, let alone Korean – should you decide to wade into those, I wish you the very best of luck, you brave soul.
Ticking the last box will indicate that you agree to being sent messages regarding special offers. This is not compulsory (as indicated by ‘선택’).
The top box simply indicates that you agree to all of the below – therefore, in this case, to avoid any further messages from Yogiyo, I recommend that you go with box number two, and hit ‘시작하기’ in the grey box at the bottom, otherwise known as ‘Get Started’.
Phase one complete! Now that we’re into the app, we have one more job to do before we can start lusting over all the food pictures.
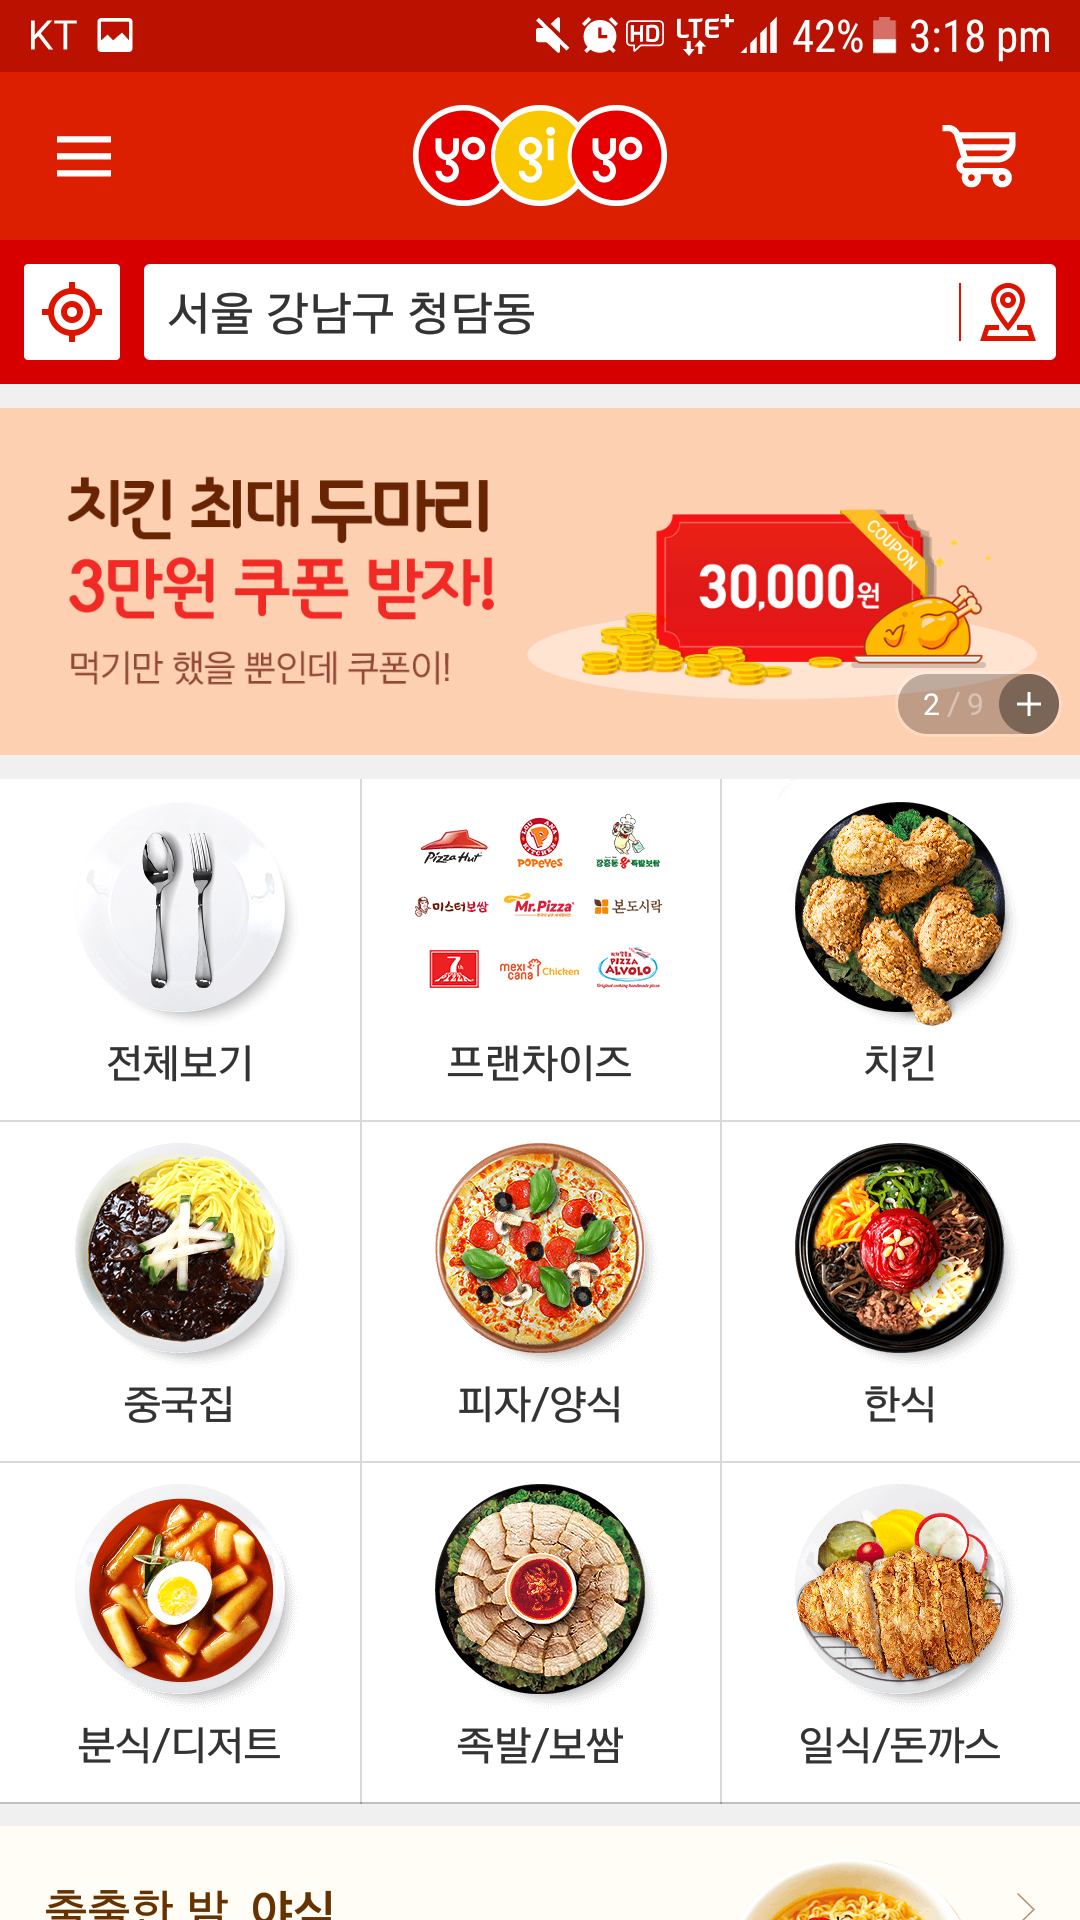 At the top of the screen now, you’ll see a search-bar type thingamabob. This is where you’ll need to whip out your Korean writing skills and type your general location – your full address isn’t needed yet, just your general area. Here I’ve typed, ‘Seoul, Gangnam-gu, Cheongdam-dong’. Doing this will allow the app to narrow the restaurants down to the ones that are able to deliver to your area.
You’ll notice a little GPS icon next to the search bar on the left – if you press this, the idea is that the app will automatically find your location and load restaurants in that area. (Personally, I’ve never had much success with this method, so I usually prefer to just type the location in.)
With that, we can finally continue on our quest for food, made much simpler with pictures – hurrah! Now is the time to decide whether you’d like to go with 한식 (Korean food) or 일식 (Japanese food); 양식 (Western food) or 중국집 (Chinese). Of course, if you’re feeling indecisive, you could always hit 전체보기, which will allow you to take a look at everything. Let’s say you decide to go with some good old-fashioned 치킨, or chicken.
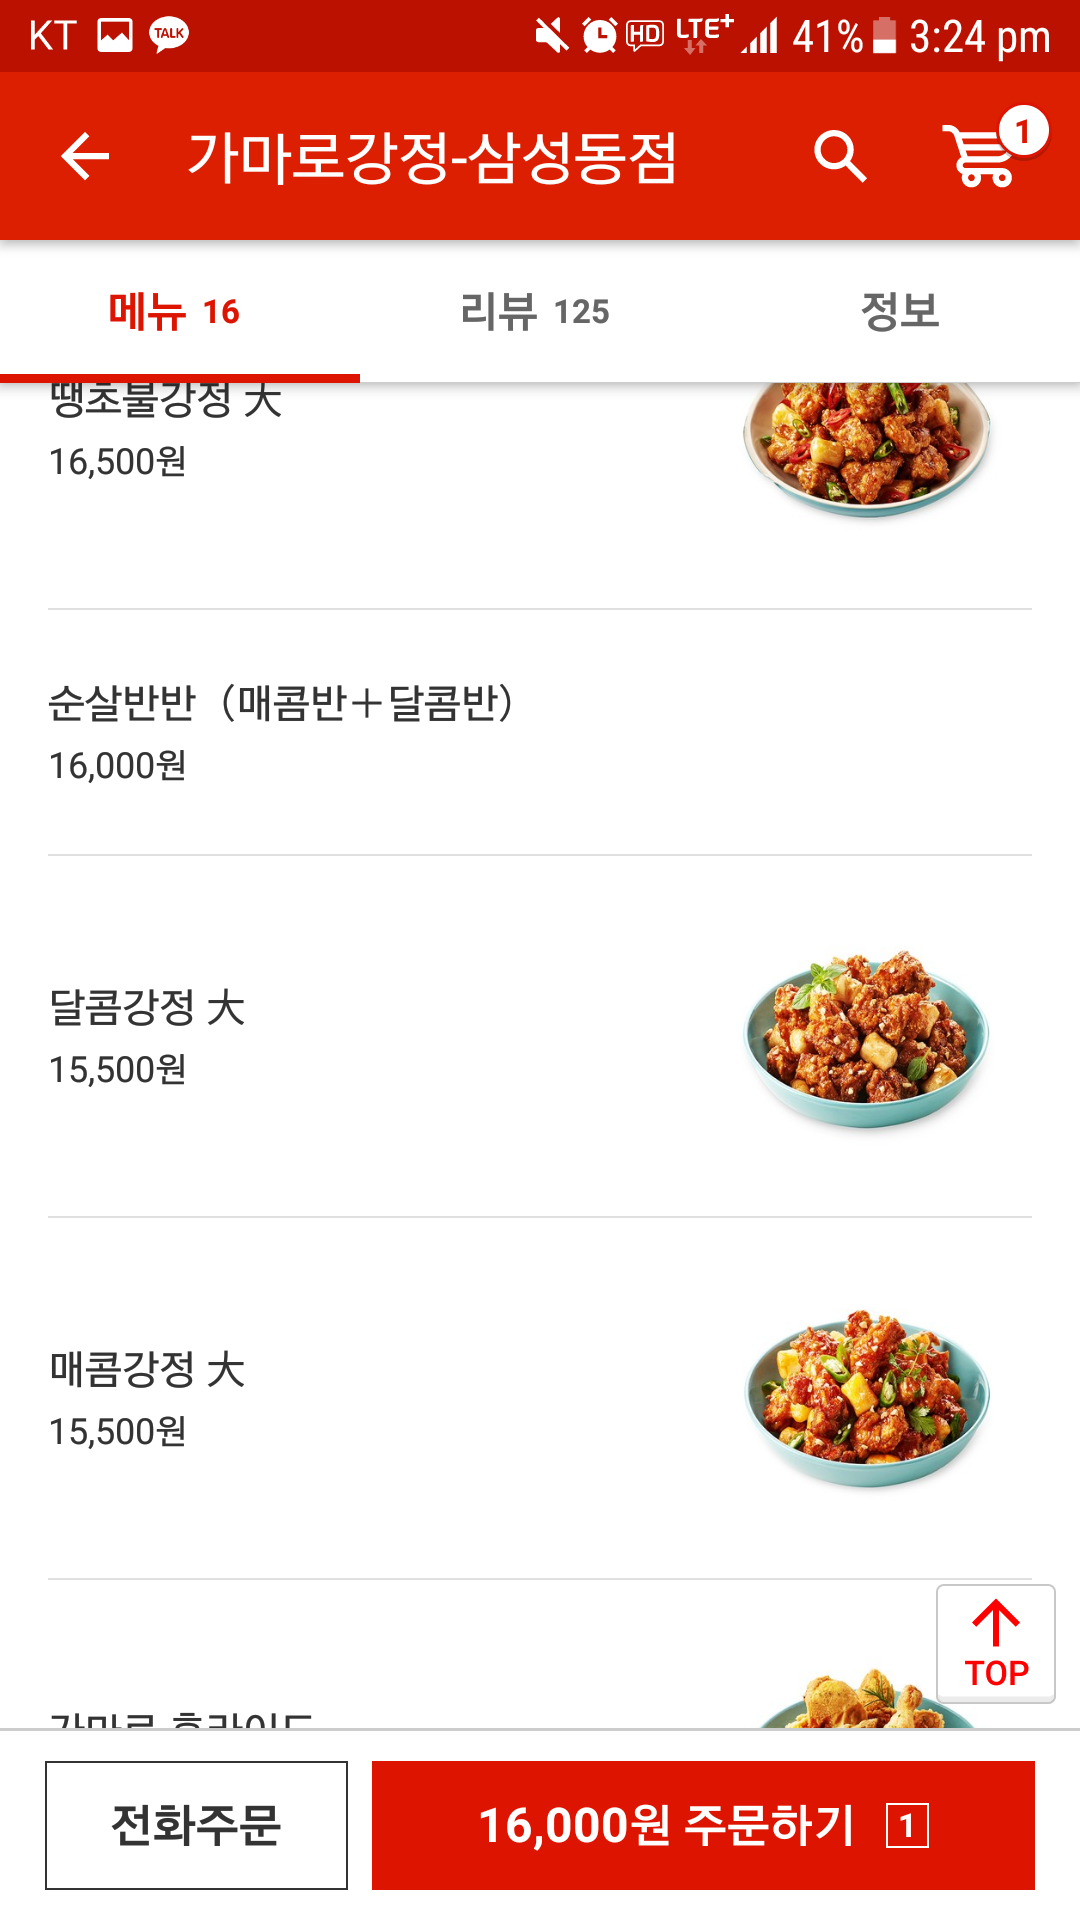
At this point, you’ll see a long list of all the chicken joints that can deliver to your location. For quick reference, you can look at the star ratings to see what other users think of the restaurant. Scroll through and see what takes your fancy, and click on the restaurant of your choice to check out their menu.
Once you’ve selected your food and added it to your basket by simply clicking on the items that you want, it’s time to let the app know where you are and how you intend to pay – we’re almost there! Hit ‘주문하기’, or ‘Order’ in the bottom left corner to continue.
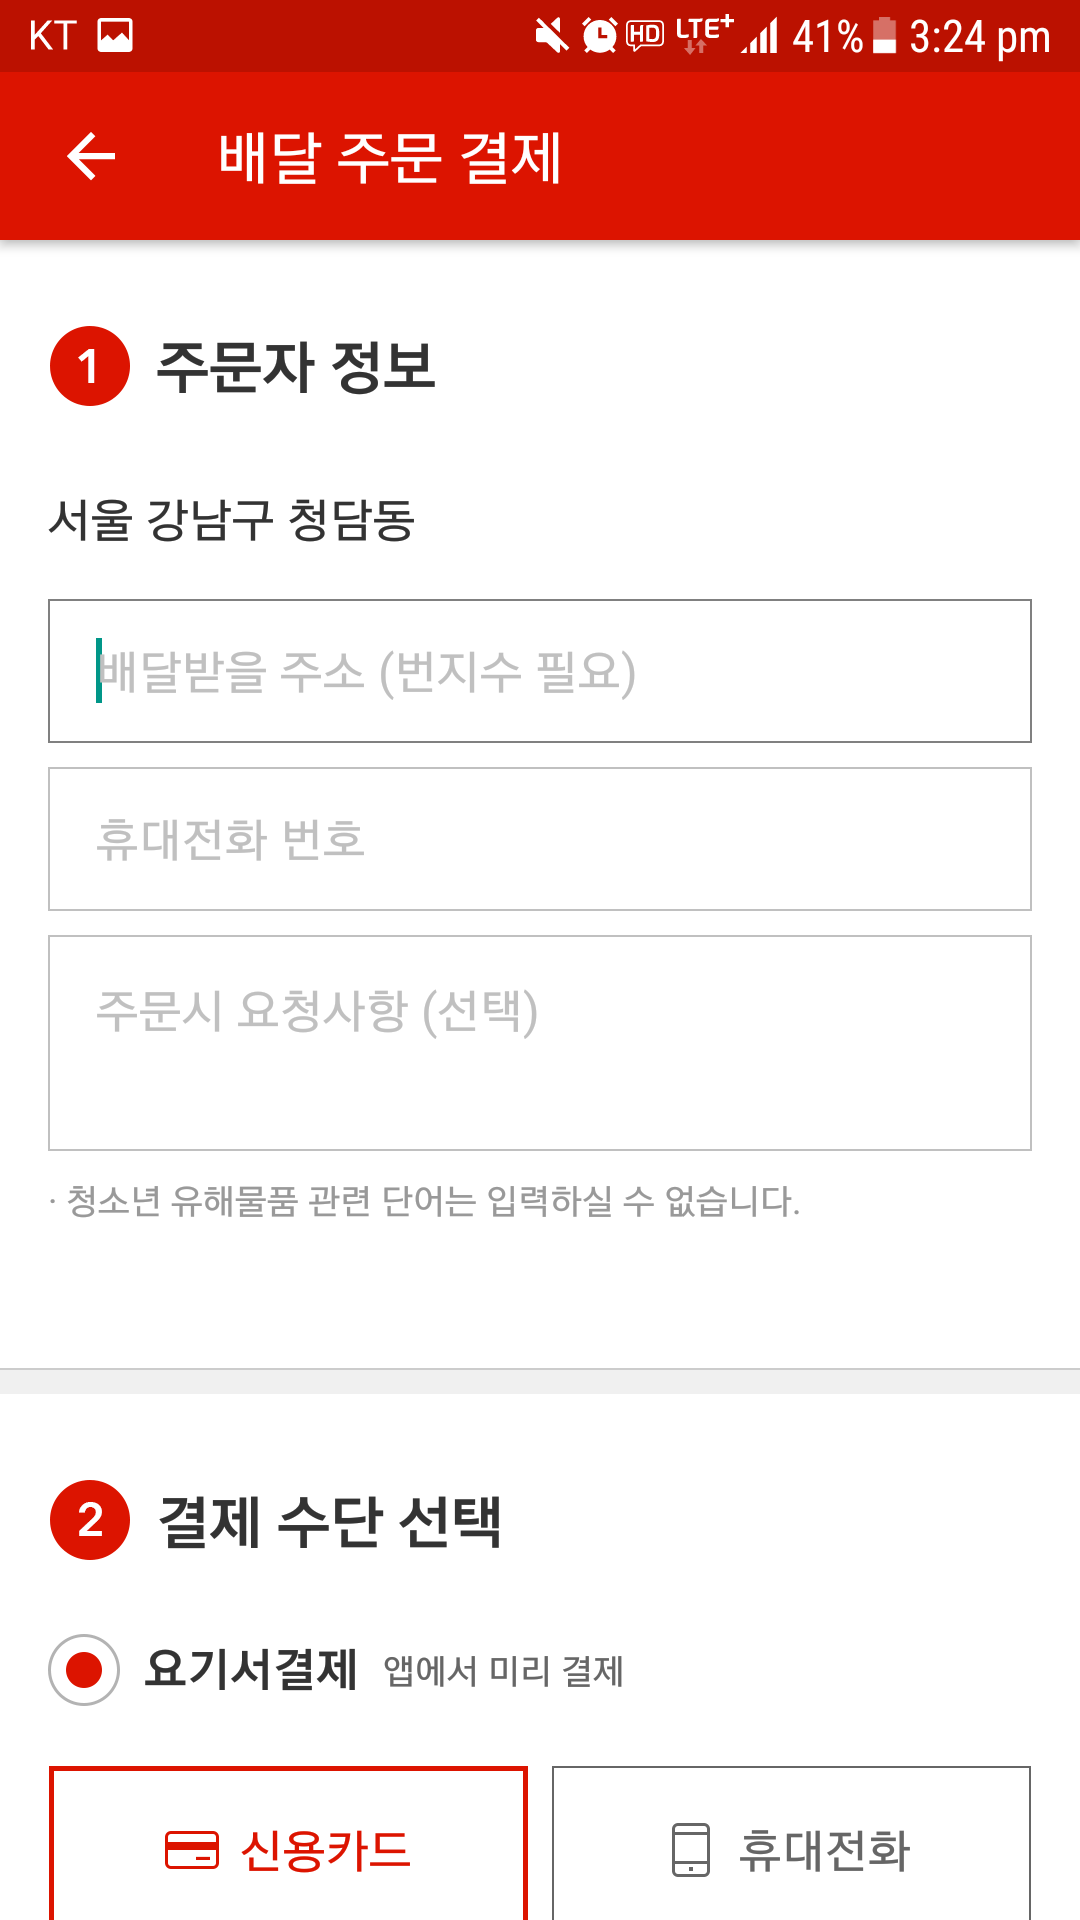
We’re in the final stages of our food-ordering quest! There are some scary-looking boxes to fill out at this stage, but I promise it’s not as bad as it looks.
Section 1: The top box is where your address needs to go. I took an extremely long time to remember my own address when I first arrived in Korea – so if you’re anything like me, this is the time to dig out your ARC and copy it from the back!
The second box is where your phone number needs to go.
The third box is for you to make any notes to the restaurant. If you know your apartment is particularly hard to find, you can leave some helpful notes for the delivery service here.
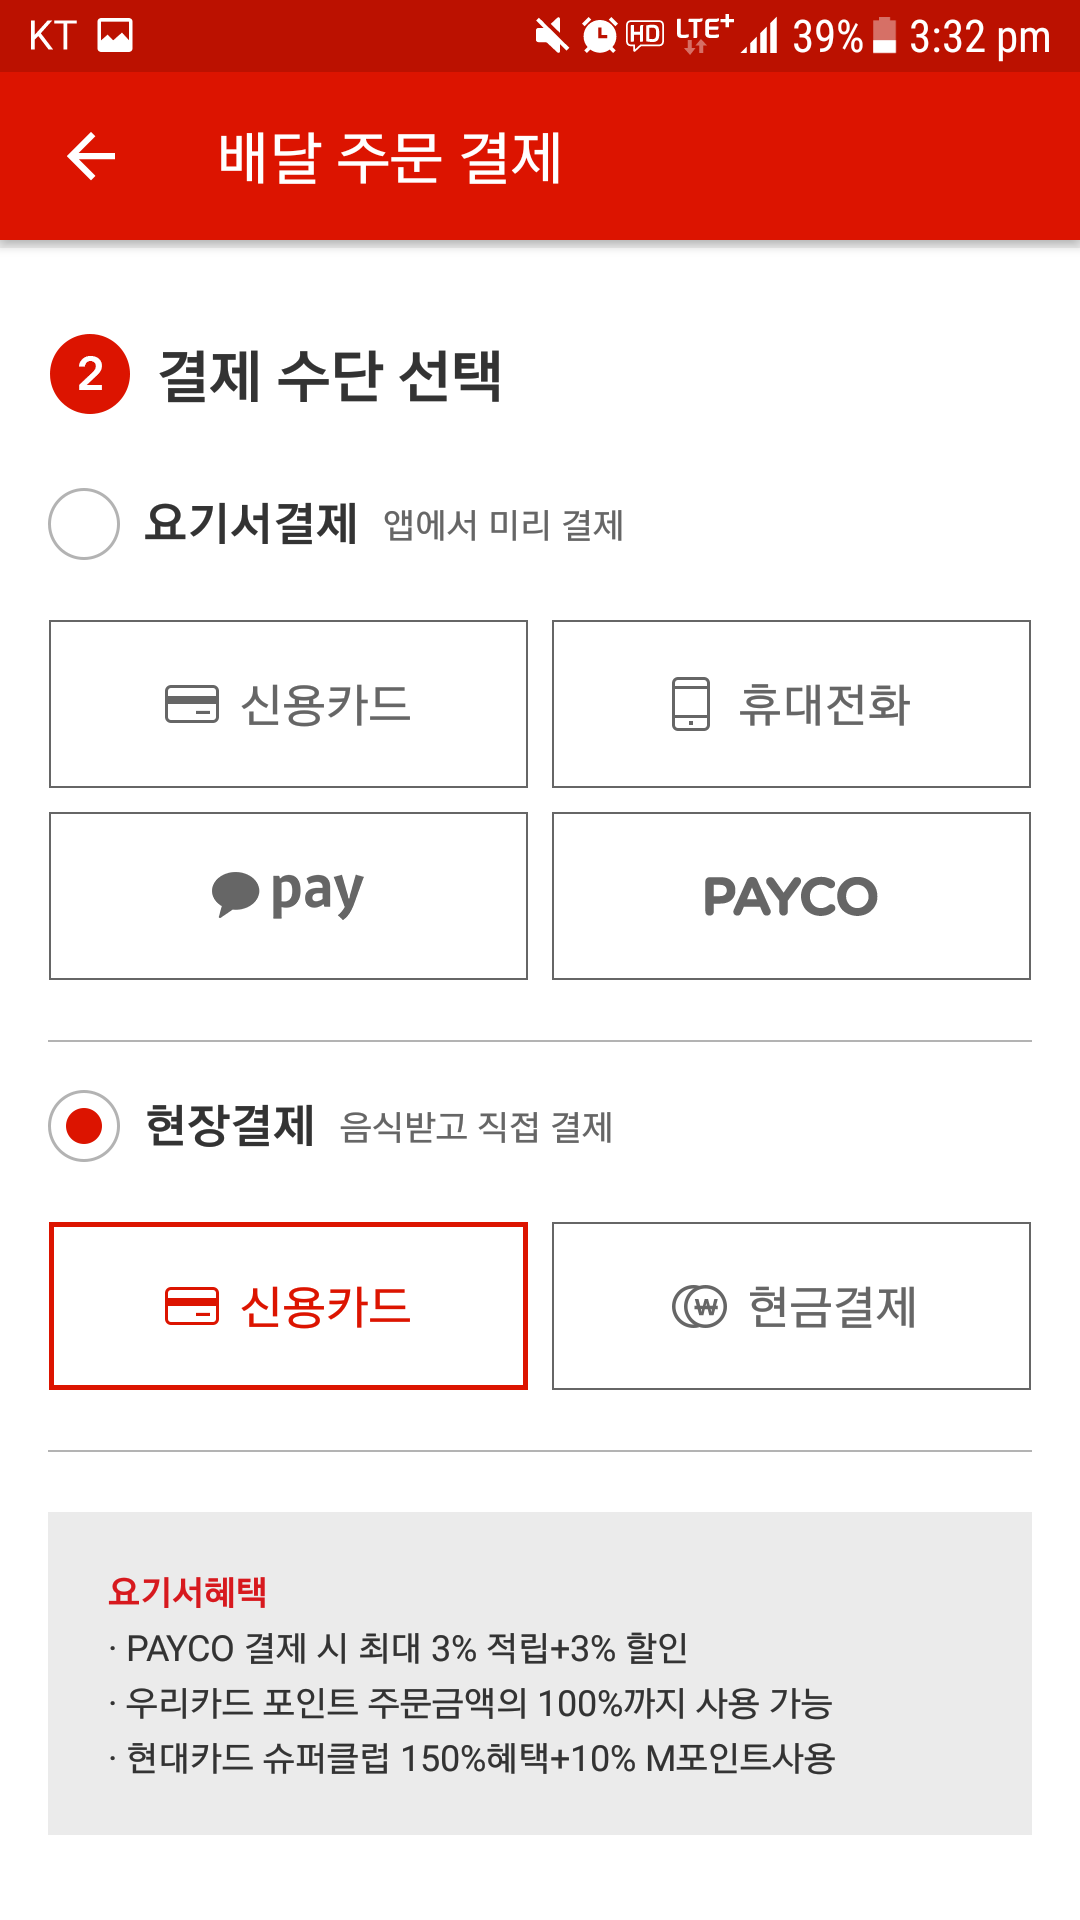
Section 2: This is where you decide your payment method. You don’t need to input any card details here – the driver will have a card machine so you can pay once they arrive.
Under the heading, ‘현장결제’, select whether you would like to pay by card (신용카드) or by cash (현금결제).
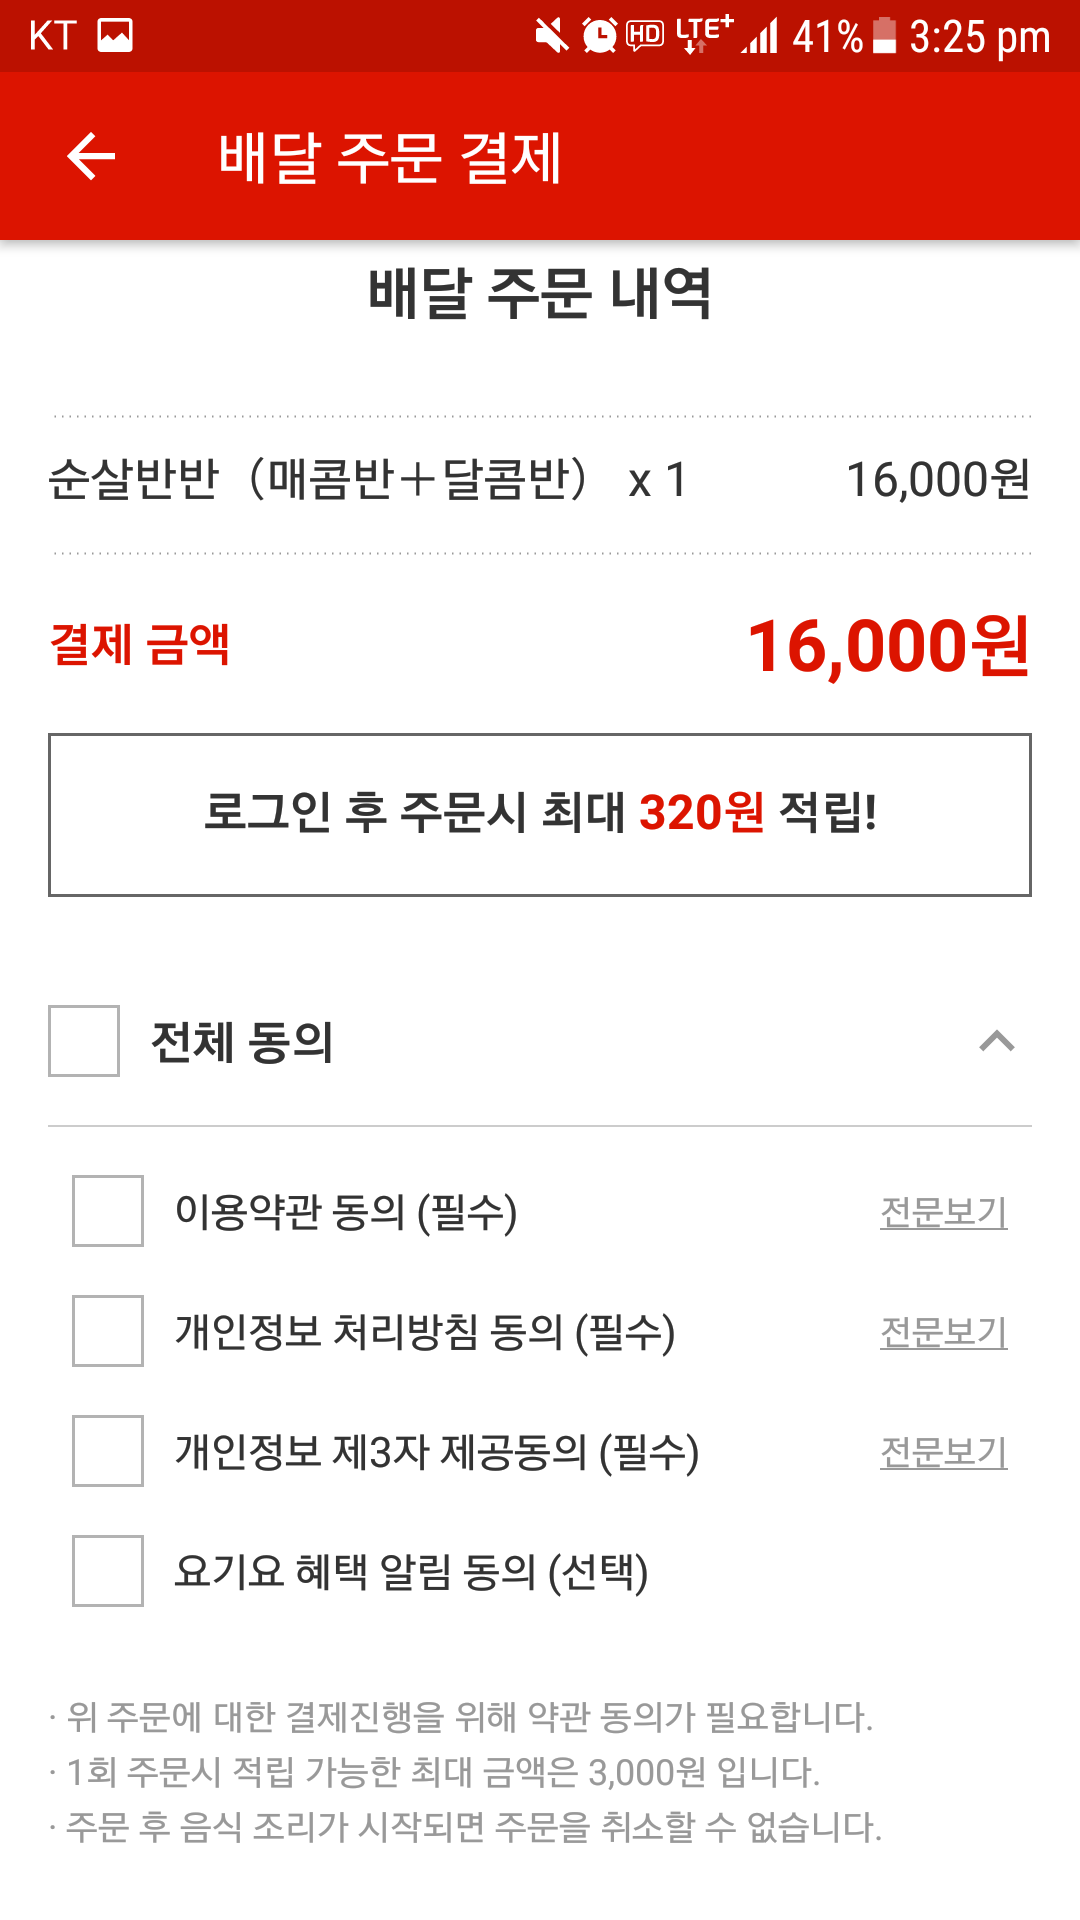 Lastly, you’ll see a confirmation of what you ordered, and what it’s going to cost you.
Underneath this information is another set of terms and conditions boxes for us to check – remember that 필수 means necessary, and 선택 means optional.
Once you’re ready and you’ve agreed to the terms and conditions, hit the big red button at the bottom and line up some good TV to watch, because your order is complete and on its way!
You’ll receive a confirmation text to the phone number you provided, which will also give you an idea of how long your food will take to arrive.
I should mention that in rare cases you may get a phone call from the restaurant or delivery driver, which will always be in Korean. This has only occurred very occasionally in my personal experience and has never been too difficult to navigate, even with the most basic of Korean skills.
There are other apps that allow you to order food in Korea with ease, but these are the two I find myself coming back to the most. I really hope that this walk-through has been helpful – now, go eat something!
Writer: Laura Dewey
Editor: Kaily Long
Lead Contributor: Rachel Cassiline Pinnock


Thank you very much Laura. I dont know if i make a successful order and ger the food in the middle of the night. But it gets me go through the ordering.
Great info except you should point out that Yogiyo needs a Korean phone number to work, which rather defeats the whole point of giving this info…Can’t order food without one! Uber Eats is the way to go, but not for late night food!
[…] Rob Marchant business, Culture February 16, 2019July 28, 2019 Image from Korvia […]
[…] is fully in Korean, but it is one of the most popular food delivery apps in Korea. This guide at Korvia will help you order food on Yogiyo like a […]
[…] How to Use YogiYo: https://www.korvia.com/ordering-takeout-seoul/ […]
It’s not hard to get a Korean phone number. You can easily get a prepaid # for cheap, even if you are just visiting. Enjoy your time <3